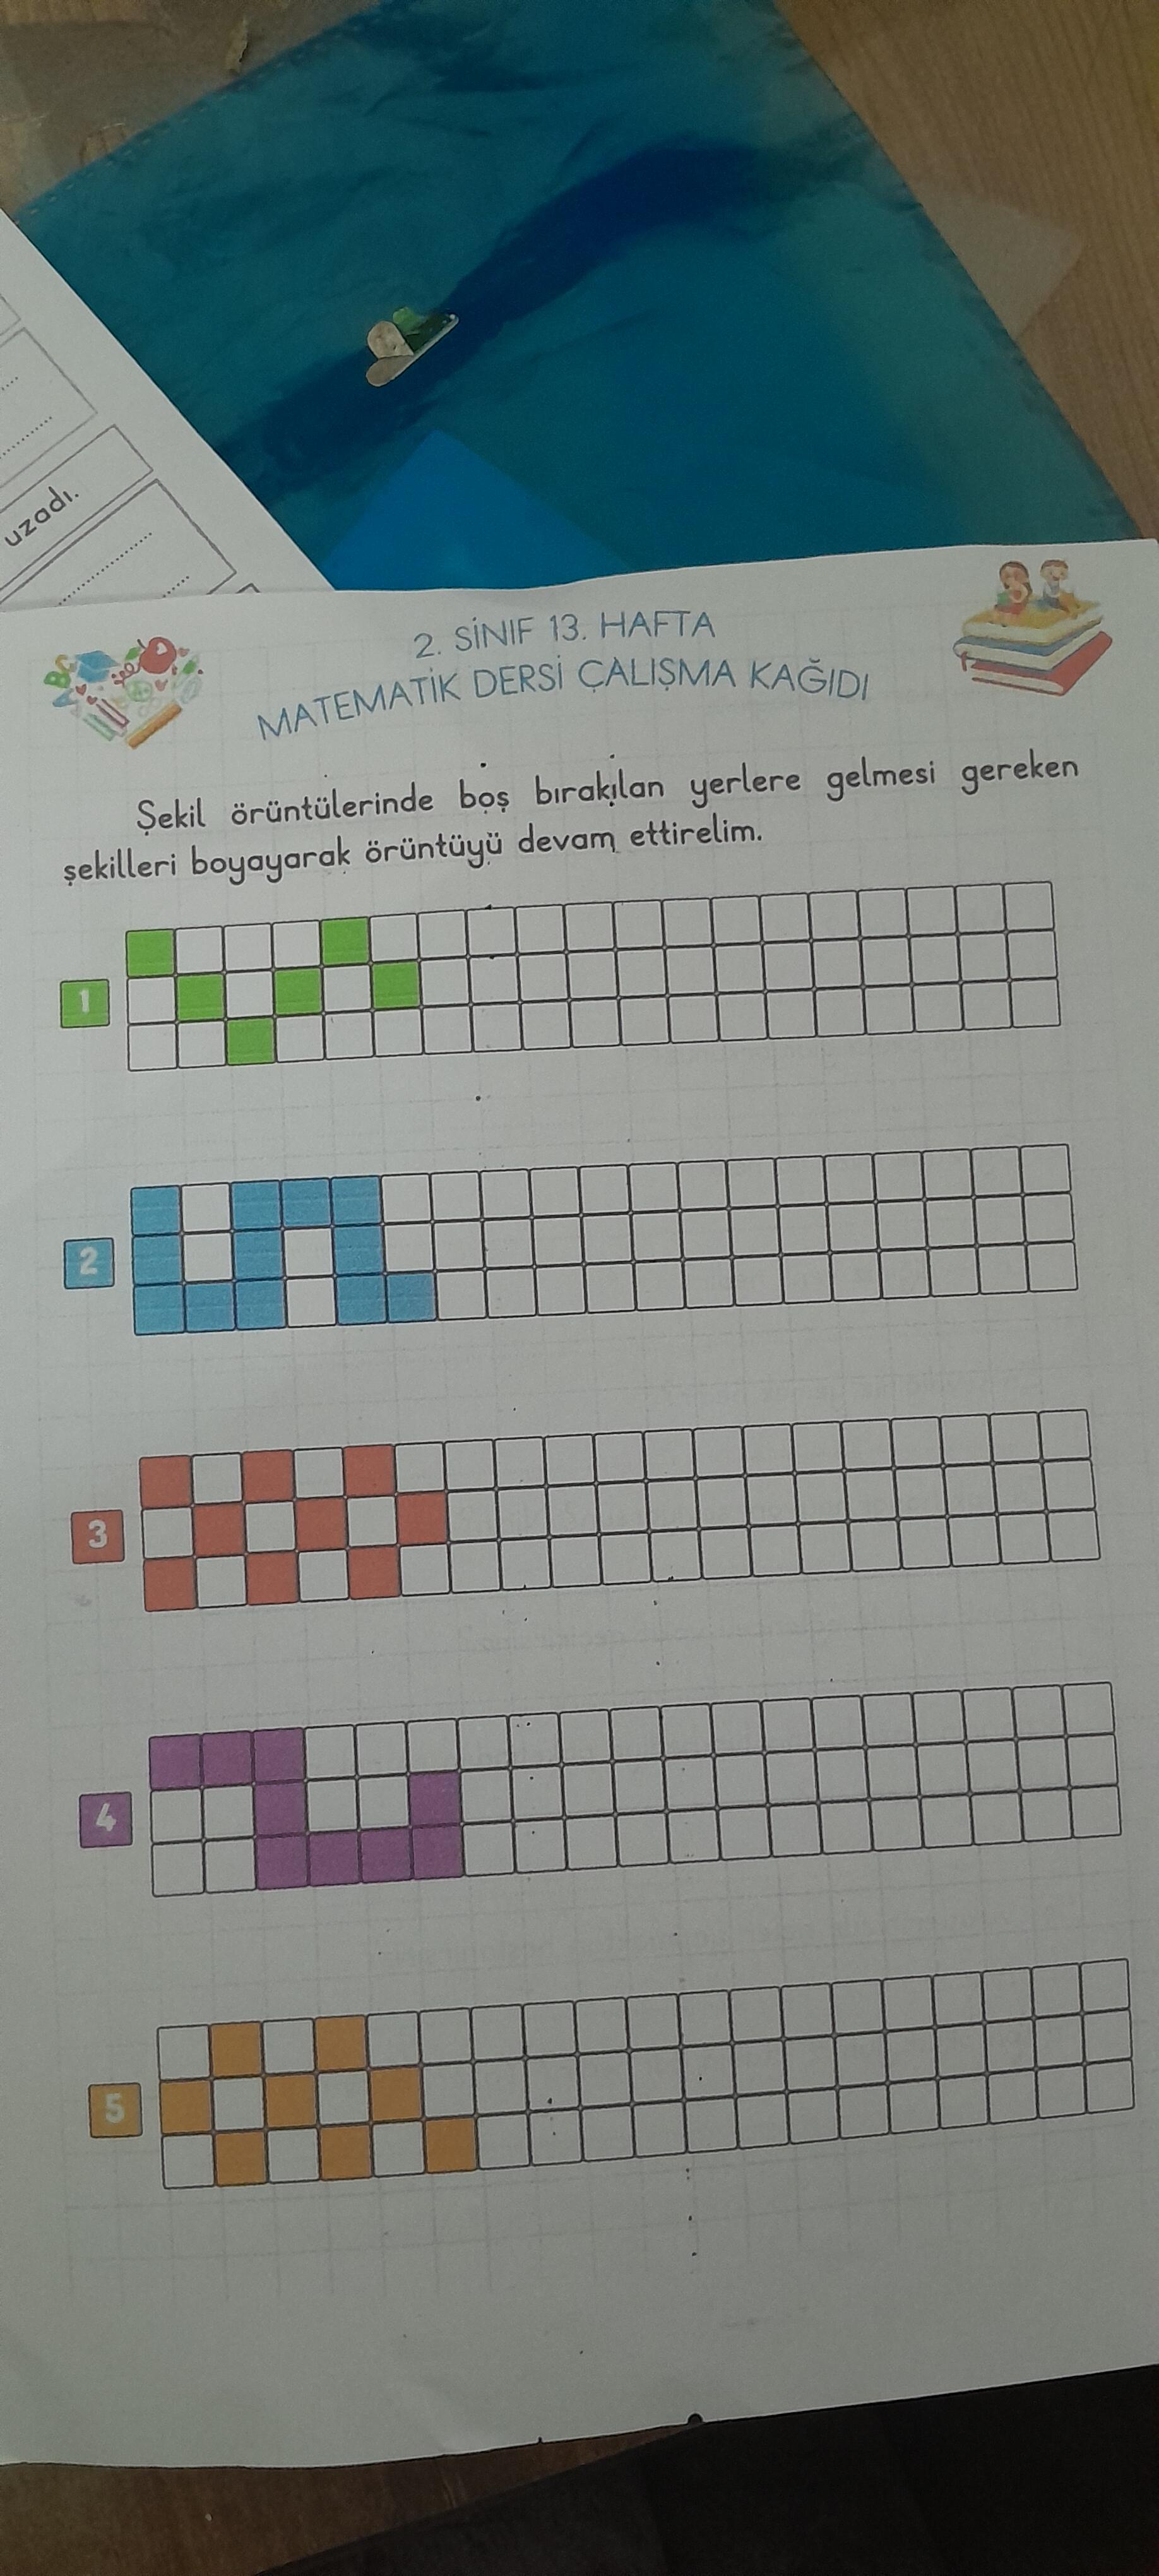
How to continue the patterns by coloring the empty squares in the given math worksheet?
Answer:
Let’s analyze each pattern step by step and continue it by coloring the empty squares accordingly.
Pattern 1 (Green squares)
- The pattern shows a sequence of green squares and empty squares.
- The first 3 squares are green, then 1 empty, then 3 green, then 1 empty, and so on.
- The pattern repeats every 4 squares: 3 green, 1 empty.
To continue:
- Color the next 3 squares green, then leave 1 empty, and repeat this sequence until the row ends.
Pattern 2 (Blue squares)
- The pattern shows 2 blue squares, 2 empty squares, 2 blue squares, 2 empty squares, and so on.
- The pattern repeats every 4 squares: 2 blue, 2 empty.
To continue:
- Color 2 squares blue, then leave 2 empty, and repeat.
Pattern 3 (Red squares)
- The pattern shows 1 red square, 1 empty, 1 red, 1 empty, 1 red, 1 empty, and so on.
- The pattern repeats every 2 squares: 1 red, 1 empty.
To continue:
- Color 1 square red, leave 1 empty, and repeat.
Pattern 4 (Purple squares)
- The pattern shows 1 purple square, 2 empty, 1 purple, 2 empty, and so on.
- The pattern repeats every 3 squares: 1 purple, 2 empty.
To continue:
- Color 1 square purple, leave 2 empty, and repeat.
Pattern 5 (Orange squares)
- The pattern shows 2 orange squares, 1 empty, 2 orange squares, 1 empty, and so on.
- The pattern repeats every 3 squares: 2 orange, 1 empty.
To continue:
- Color 2 squares orange, leave 1 empty, and repeat.
Summary Table of Patterns
| Pattern No. | Color | Repetition Unit | Coloring Sequence |
|---|---|---|---|
| 1 | Green | 4 squares | 3 green, 1 empty |
| 2 | Blue | 4 squares | 2 blue, 2 empty |
| 3 | Red | 2 squares | 1 red, 1 empty |
| 4 | Purple | 3 squares | 1 purple, 2 empty |
| 5 | Orange | 3 squares | 2 orange, 1 empty |
By following these rules, you can continue coloring the empty squares to complete the patterns exactly as required.
If you want, I can help you with a visual representation or step-by-step coloring for each pattern.
Örüntüleri Tamamlama Mantığı
Her bir satırdaki boş kareleri boyamadan önce şu adımları izliyoruz:
- Örüntünün “birim uzunluğunu” (kaç karede bir tekrar ettiği) belirle.
- O birim içindeki hangi pozisyondaki karelerin boyalı olduğunu tespit et.
- Aynı “boyanacak pozisyonlar”ı tüm satır boyunca, sıra numaralarına göre tekrar et.
1. Kare Numaralandırma ve Örüntü Birimleri
– Her satırda soldan sağa 1’den başlayarak kareleri numaralandırın.
– Aşağıdaki tabloda her örüntü satırı için “birim uzunluğu” (adu), birim içindeki boyanacak pozisyonlar ve 1–20 arasındaki boyanacak kare numaraları yer alıyor. (Kare sayınız 20’den fazlaysa aynı listede devam edebilirsiniz.)
| Satır No | Renk | Birim Uzunluğu (adu) | Birim İçinde Boyanacak Pozisyonlar | Boyanacak Kare Numaraları (1–20) |
|---|---|---|---|---|
| 1 | Yeşil | 4 | 1., 2., 4. | 1, 2, 4, 5, 6, 8, 9, 10, 12, 13, 14, 16, 17, 18, 20 |
| 2 | Mavi | 5 | 1., 2., 3. | 1, 2, 3, 6, 7, 8, 11, 12, 13, 16, 17, 18 |
| 3 | Kırmızı | 4 | 1., 2. | 1, 2, 5, 6, 9, 10, 13, 14, 17, 18 |
| 4 | Mor | 5 | 1., 3. | 1, 3, 6, 8, 11, 13, 16, 18 |
| 5 | Turuncu | 4 | 1., 2. | 1, 2, 5, 6, 9, 10, 13, 14, 17, 18 |
2. Örnek: 1. Satırı Boyamak (Yeşil)
- Birim uzunluğu 4 → kareleri 4’lü gruplara ayırın:
(1 – 4), (5 – 8), (9 – 12), (13 – 16), (17 – 20) - Her grupta 1., 2. ve 4. kareleri boyayın.
- Sonuç:
- 1., 2., 4. kareler
- 5., 6., 8. kareler
- 9., 10., 12. kareler
- 13., 14., 16. kareler
- 17., 18., 20. kareler
Aynı yöntemi diğer satırlar için de uygulayın.
3. Adım Adım Uygulama
- Çalışma kağıdındaki her satırı 1’den başlayarak karelere numara verin.
- Yukarıdaki tablodan o satırın “birim uzunluğu”nu ve boyanacak pozisyonları bulun.
- Boyanacak pozisyonları her birimde tekrar ederek tüm satırdaki boş kareleri boyayın.
4. Kısaca Özet
- Örüntüler “tek birimde” (adu) tekrarlanır.
- Birim içindeki hangi karelerin renkli olduğunu tespit edin.
- Tüm satır boyunca aynı konumları boyayın.
Bu yöntemle tüm boş kareleri eksiksiz boyayarak örüntüyü tamamlayabilirsiniz. @Serap_Soy