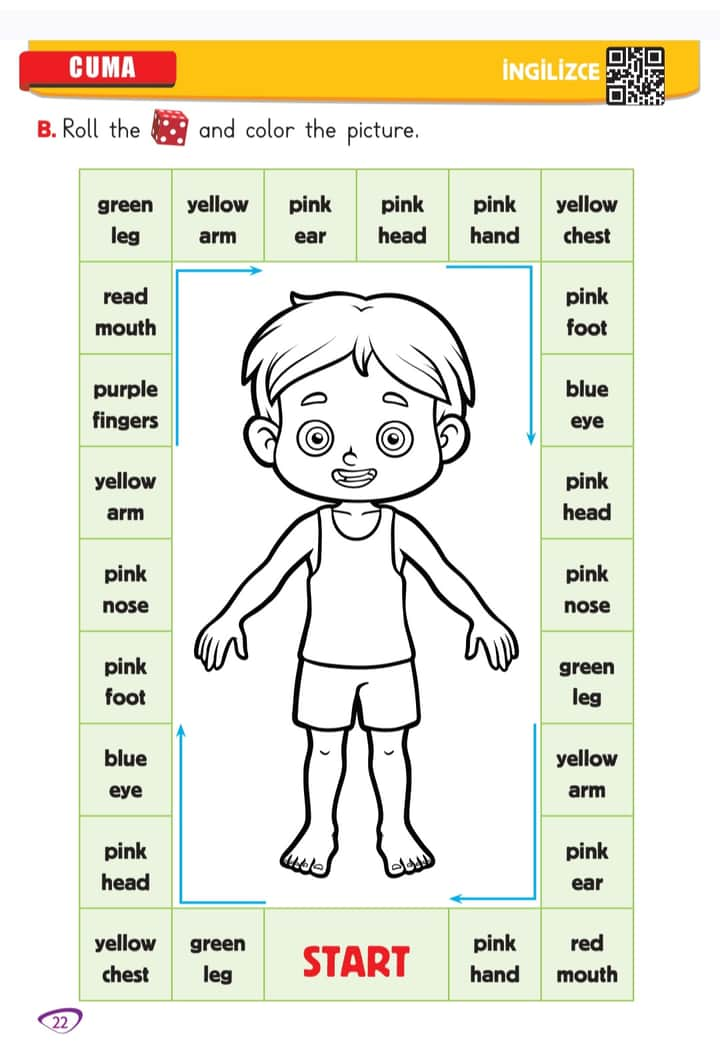
How to Color the Picture by Rolling the Dice (Instruction Explanation)
Önemli Noktalar
- Follow the arrow path around the board, starting from “START”.
- Roll the dice and move forward that many steps.
- Color the indicated body part with the corresponding color shown in each square.
- The colored parts include leg, arm, ear, head, hand, chest, mouth, fingers, foot, eye, nose.
The instructions direct you to roll a dice, move according to the number rolled along the path surrounding the picture, and paint each body part as indicated by the color and label in each square.
İçindekiler
Instructions Summary
Starting from the “START” block, you roll the dice and count the spaces clockwise following the arrows around the picture. Each space tells you which body part to color and with what color. For example, “green leg” means the leg should be colored green.
Pro Tip: To avoid confusion, mark each colored part lightly first, then fully color once you finish the game.
Step-by-Step Coloring Process
- Place your marker on “START”.
- Roll the dice and move ahead that many squares in the direction of the arrow.
- Read the color and body part on the square you land on.
- Color the corresponding part of the child in the picture.
- Repeat rolling, moving, and coloring until you decide to stop or finish the circuit.
Example:
- If you roll a 3 from the start, move 3 squares: “pink hand” → color the child’s hands pink.
Quick Checklist
- [ ] Roll dice starting from “START”
- [ ] Follow the arrows clockwise around the picture
- [ ] Match each square’s color and body part label
- [ ] Color carefully on the picture
- [ ] Continue playing until finished or as desired
Sonraki Adımlar
Would you like me to create a printable version of this game with instructions for easy home use?
Zarı atın ve resmi boyayın.
• Zar atılarak oynanır.
• Her karedeki talimata göre ilgili vücut bölümü belirtilen renge boyanır.
• Amaç, zarların yönlendirmesiyle resmi tamamen renklendirmektir.
İçindekiler
1. Oyun Talimatları
- Başlangıç noktasından (START) okların gösterdiği yönde ilerleyin.
- Sıranız geldiğinde zar atın ve zar sayısı kadar kare ilerleyin.
- Üzerinde durduğunuz karede yazan “renk + vücut bölümü” ifadesine göre çizimdeki ilgili bölgeyi o renge boyayın.
- Tüm kareleri dolaşıp resmi tamamen boyayana kadar devam edin.
2. Karelerin Anlamı
Her karede iki bilgi bulunur:
- Renk (green, yellow, pink, blue, red, purple)
- Vücut bölümü (leg, arm, ear, head, hand, chest, foot, eye, nose, fingers, mouth)
Örnek:
- “green leg” → Bacakları yeşil boya
- “purple fingers” → Parmakları mor boya
3. Vücut Bölümleri ve Renkler
Aşağıda İngilizce-Türkçe karşılıklarıyla en sık geçen tüm kombinasyonlar:
| İngilizce Terim | Türkçe Karşılık |
|---|---|
| green leg | yeşil bacak |
| yellow arm | sarı kol |
| pink ear | pembe kulak |
| pink head | pembe baş |
| pink hand | pembe el |
| yellow chest | sarı göğüs |
| pink foot | pembe ayak |
| blue eye | mavi göz |
| red mouth | kırmızı ağız |
| purple fingers | mor parmaklar |
| pink nose | pembe burun |
4. Oyun Örnek Akışı
- START noktasından 4 atılır → “green leg” karesine gelinir → bacakları yeşile boyarsınız.
- Sonraki zar’da 2 gelir → “pink hand” → elleri pembe boya.
- Tekrar atıldığında 5 gelir → “purple fingers” → parmakları mor boya.
- Resimdeki diğer karelere inip sırayla boyamaya devam edin.
5. Özet Tablosu
| Kare Adımı | Zar | Talimat | Yapılacak İşlem |
|---|---|---|---|
| 1 | 4 | green leg | Bacakları yeşil boya |
| 2 | 2 | pink hand | Elleri pembe boya |
| 3 | 5 | purple fingers | Parmakları mor boya |
| … | … | … | … |
6. SSS
S1: Zarla oynarken karesiz bir hareket yapabilir miyim?
C1: Hayır, sadece zarın getirdiği adım kadar ilerleyebilirsiniz.
S2: Aynı kareye tekrar gelirsem ne olacak?
C2: Yeniden aynı bölge için boya yapabilirsiniz veya bir sonraki zar atışına geçersiniz; sınıf kuralına göre karar verin.
S3: Tüm boyaları kullanmak zorunda mıyım?
C3: Evet, oyun resmi tamamen boyayıncaya kadar sürer; boşta kalan bölge kalmamalı.
Resmi boyamaya hazır mısın? Hangi renkle başlayacaksın?
@Suzan_Sezgun